Bicycle Back Safety Light Circuit Schematic

Flashing 13 LED unit, 3V supply, Also suitable for jogger/walkers

This circuit has been designed to provide a clearly visible light, formed by 13 high efficiency flashing LEDs arranged in a pseudo-rotating order. Due to low voltage, low drain battery operation and small size, the device is suitable for mounting on bicycles as a back light, or to put on by jogger/walkers. IC1 is a CMos version of the 555 IC wired as an astable multivibrator generating a 50% duty-cycle square wave at about 4Hz frequency.

At 3V supply, 555 output (pin 3) sinking current operation is far better than sourcing, then LEDs D1-D6 are connected to the positive supply rail. In order to obtain an alternate flashing operation, a second 555 IC is provided, acting as a trigger plus inverter and driving LEDs D7-D12. D13 is permanently on. The LEDs are arranged in a two series display as shown below, with a center LED permanently on. This arrangement and the alternate flashing of the two series of LEDs provide a pseudo-rotating appearance.

Circuit diagram:
Bicycle Back Safety Light Schematic Circuit Diagram
Parts:

R1 = 10K
R2 = 100K
R3 = 10R
R4 = 10R
R5 = 10R
R6 = 10R
R7 = 10R
R8 = 10R
R9 = 100K
R10 = 100K
R11 = 10R
R16 = 10R
R17 = 150R
C1 = 1µF-63V
C2 = 10nF-63V
C3 = 100µF-25V
B1 = 3V Battery (2 AA 1.5V Cells in series)
SW1 = SPST Slider Switch
D1-D13 = Red LEDs 5mm. or bigger, high efficiency
IC1-IC2 = 7555 or TS555CN CMos Timer IC

LED arrangement:
Notes:
  • Flashing frequency can be varied changing C1 value.
  • High efficiency LEDs are essential.

Computer Off Switch

How often does it happen that you close down Windows and then forget to turn off the computer? This circuit does that automatically. After Windows is shut down there is a ‘click’ a second later and the PC is disconnected from the mains. Surprisingly enough, this switch fits in some older computer cases. If the circuit doesn’t fit then it will have to be housed in a separate enclosure. That is why a supply voltage of 5 V was selected. This voltage can be obtained from a USB port when the circuit has to be on the outside of the PC case.

It is best to solder the mains wires straight onto the switch and to insulate them with heat shrink sleeving. C8 is charged via D1. This is how the power supply voltage for IC1 is obtained. A square wave oscillator is built around IC1a, R1 and C9, which drives inverters IC1c to f. The frequency is about 50 kHz. The four inverters in parallel power the voltage multiplier, which has a multiplication of 3, and is built from C1 to C3 and D2 to D5. This is used to charge C5 to C7 to a voltage of about 9 V.

The generated voltage is clearly lower than the theoretical 3x4.8=14.4 V, because some voltage is lost across the PN-junctions of the diodes. C5 to C7 form the buffer that powers the coil of the switch when switching off. The capacitors charge up in about two seconds after switching on. The circuit is now ready for use. When Windows is closed down, the 5-V power supply voltage disappears. C4 is discharged via R2 and this results in a ‘0’ at the input of inverter IC1b. The output then becomes a ‘1’, which causes T1 to turn on.

Circuit diagram:
Computer Off Switch Circuit Diagram

A voltage is now applied to the coil in the mains switch and the power supply of the PC is turned off. T1 is a type BSS295 because the resistance of the coil is only 24R. When the PC is switched on, the circuit draws a peak current of about 200 mA, after which the current consumption drops to about 300 µA. The current when switching on could be higher because this is strongly dependent on the characteristics of the 5-V power supply and the supply rails in the PC. There isn’t much to say about the construction of the circuit itself.

The only things to take care with are the mains wires to the switch. The mains voltage may not appear at the connections to the coil. That is why there has to be a distance of at least 6 mm between the conductors that are connected to the mains and the conductors that are connected to the low-voltage part of the circuit.
Author: Uwe Kardel - Copyright: Elektor Electronics Magazine

Traffic Lights For Model Cars Or Model Railways

Kids these days seem to have most things you see in the toy shops, so if you have a son or grandson who has a collection of cars, here is something he will really appreciate. And it will be really special as you will be giving something made by you - a set of traffic lights for his cars. This traffic light circuit uses a 555 timer IC as the master timer. The 220kO timing resistor and 10µF capacitor control the timing pulses, giving a period of about three seconds. The 3-second output pulses are used to clock a 4017 decade counter whose outputs directly drive the green, orange and red LEDs. To obtain a longer time for the red and green lights compared with the orange light, two outputs are ORed using 1N4148 diodes for the red and green LEDs, while the orange is driven by one output only.

This gives about 6 seconds for the red and green LEDs and 3 seconds for the orange. When power is first applied, the RC network connected to pins 1 and 15 of IC2 resets the 4017 and the green LED cycle begins. The orange and red cycles follow and at the end of the red cycle, pin 1 will go high to reset the 4017 to start the green cycle all over again. You can experiment with the cycle times by adjusting the 220kO resistor or by combining more or less 4017 outputs to achieve different ON times for the three LEDs.

Circuit diagram:

The circuit is designed to be powered by a 9V battery and this is the maximum voltage that is recommended. This is because the LEDs are directly driven by the 4017 with no current limiting resistor being used. The 4017 naturally limits the current that it can supply to 15mA. An extension of this project would be to make a second set of lights for the cross traffic. Here you would use the same 555 as a master timer for both sets of lights (otherwise chaos would ensue) and a separate 4017 to drive the three extra LEDs. Of course, you would have to take care and ensure that green and orange outputs on each set of lights correspond with red on the other!
Author: Jack Holliday - Copyright: Silicon Chip Electronics
Source: Xtreme Circuits

Using LED As A Light Sensor

This circuit shows how to use an ordinary LED as a light sensor. It makes use of the photovoltaic voltage developed across the LED when it is exposed to light. LEDs are cheaper than photodiodes and come with a built-in filter, which is useful when the application involves colour discrimination. The photo-voltage of a red LED (its bandgap voltage) is typically about 2V. The source impedance of this voltage is about 800MΩ in daylight, rising to infinity in darkness. A TL071 JFET input op amp is used to amplify and buffer this extremely high impedance signal.

Circuit diagram:

Resistor R1 ensures that the op amp "sees" a 0V input when the LED is in total darkness. To avoid undue loading of the signal, R1 would ideally be a 100MΩ or larger resistor but since such high values are rare and expensive I used a smaller value and increased the gain of the op amp to compensate for the voltage loss. To avoid the need for a second variable resistor to set the op amp’s input offset to zero, R1 must be large enough for the reduced voltage across the LED to swamp the op amp’s input offset voltage. With a 30MΩ resistor for R1, the voltage at the op amp input when the LED is exposed to bright light is reduced to about 60mV.

This is just over four times the 13mV maximum input offset of the TL071 op amp. R1 can be three 10MΩ resistors in series. Alternatively, I have found that a reverse-biased 1N4148 diode has an impedance of about 30MΩ (connect it in the circuit with the anode to ground). The output of the circuit is about 0V when the LED is in darkness. VR1 sets the gain of the op amp and it should be adjusted to give the required output voltage when the LED is exposed to bright light.
Author: Andrew Partridge - Copyright: Silicon Chip

CMOS Crystal Frequency Multiplier

Crystals usually operate at fundamental frequencies up to about 15 MHz. Whenever higher frequencies are required a frequency multiplier is placed after the crystal oscillator. The resulting output signal is then a whole multiple of the crystal frequency. Other frequency multipliers often use transistors, which produce harmonics due to their non-linearity. These are subsequently filtered from the signal. One way of doing this is to put a parallel L-C filter in the collector arm. This filter could then be tuned to three times the input frequency. A disadvantage is that such a circuit would quickly become quite substantial.


This circuit contains only a single IC and a handful of passive components, and has a complete oscillator and two frequency triplers. The output is therefore a signal with a frequency that is 9 times as much as that of the crystal. Two gates from IC1, which contains six high-speed CMOS inverters, are used as an oscillator in combination with X1. This works at the fundamental frequency of the crystal and has a square wave at its output. A square wave can be considered as the sum of a fundamental sine wave plus an infinite number of odd multiples of that wave. The second stage has been tuned to the first odd multiple (3 x).


We know that some of our readers will have noticed that the filter used here is a band-rejection (series LC) type. Worse still, when you calculate the rejection frequency you’ll find that it is equal to the fundamental crystal frequency! The fundamental frequency is therefore attenuated, which is good. But how is the third harmonic boosted? That is done by the smaller capacitor of 33 pF in combination with the inductor. Together they form the required band-pass filter. (The same applies to the 12 pF capacitor in the next stage.) Through the careful selection of components, this filter is therefore capable of rejecting the fundamental and boosting the third harmonic! Clever, isn’t it?.


The output in this example is a signal of 30 MHz. The inverter following this stage heavily amplifies this signal and turns it into a square wave. The same trick is used again to create the final output signal of 3 times 30 MHz = 90 MHz. At 5 V this circuit delivers about 20 milliwatt into 50 R. This corresponds to +13 dBm and is in theory enough to drive a diode-ring balanced mixer directly. The circuit can be used for any output frequency up to about 100 MHz by varying the component values. When, for example, an 8 MHz crystal is used to obtain an output frequency of 72 MHz (9 x 8 = 72), the frequency determining inductors and capacitors have to be adjusted by a factor of 10/8.

You should round the values to the nearest value from the E12 series. Another application is for use in an FM transmitter; if you connect a varicap in series with the crystal, you can make an FM modulator. An added bonus here is that the relatively small modulation level is also increased by a factor of 9. Crystals with frequencies near 10 MHz are relatively easy to find and inexpensive, so you should always be able to find a suitable frequency within the FM band. A crystal of 10.245 MHz for instance would give you a frequency of 92.205 MHz and 10.700 MHz results in an output of 96.300 MHz. You may find that the circuit operates on the border of the HC specifications. If this causes any problems you should increase the supply voltage a little to 6V.
Author: Gert Baars
Copyright: Elektor Electronics

12V Fan Directly on 220V AC

This circuit idea is certainly not new, but when it comes to making a trade-of between using a small, short-circuit proof transformer or a capacitive voltage divider (directly from 230 V mains voltage) as the power supply for a fan, it can come in very handy. If forced cooling is an afterthought and the available options are limited then perhaps there is no other choice. At low currents a capacitive divider requires less space than a small, short-circuit proof transformer.

R1 and R2 are added to limit the inrush current into power supply capacitor C2 when switching on. Because the maximum rated operating voltage of resistors on hand is often not known, we choose to have two resistors for the current limit. The same is true for the discharge resistors R3 and R4 for C1. If the circuit is connected to a mains plug then it is not allowed that a dangerous voltage remains on the plug, hence R3 and R4.

Circuit diagram:

Capacitor C1 determines the maximum current that can be supplied. Above that maximum the power supply acts as a current source. If the current is less then zener diode D1 limits the maximum voltage and dissipates the remainder of the power. It is best to choose the value of C1 based in the maximum expected current. As a rule of thumb, start with the mains voltage - when calculating C1.

The 12 V output voltage, the diode forward voltage drops in B1 and the voltage drop across R1 and R2 can be neglected for simplicity. The calculated value is then rounded to the nearest E-12 value. The impedance of the capacitor at 50 Hz is 1 / (2p50C). If, for example, we want to be able to supply 50 mA, then the required impedance is 4600 ? (230 V/50 mA). The value for the capacitor is then 692 nF.

This then becomes 680 nF when rounded. To compensate for mains voltage variations and the neglected voltage drops you could potentially choose the next higher E-12 value. You could also create the required capacitance with two smaller capacitors. This could also be necessary depending on the shape of the available space. It is best to choose for C1 a type of capacitor that has been designed for mains voltage applications (an X2 type, for example).
Ton Giesberts
Elektor Electronics 2008

Doorbell Cascade

Sometimes you have to do it the hard way, even if doing it the easy way is an option. That is the case here. The intention is to add a second doorbell in parallel with the existing bell. This does not, in principle, require any electronic components. You would simply connect the second bell to the first one. But if the existing bell transformer is not rated for the additional load then this is not a good idea! An option is to buy a new and larger transformer. But bigger also means more expensive! Moreover, replacing the existing transformer can be an awkward job, for example when it is built into the meter box. So we follow different approach.

Circuit diagram:
Doorbell Cascade Circuit Diagram

This circuit is connected in parallel with the existing bell. This is possible because the current consumption is very small compared to the load of the bell. The bridge rectifier rectifies the bell voltage when the push-button is pressed. This will then close therelay contacts. These contacts are the ‘electronic’ button for the second bell,which is powered from its own cheap bell transformer.
Author: René Bosch - Copyright: Elektor July-August 2004

LED Lighting For Consumer Unit Cupboard

The consumer unit (or ‘electricity meter’) cupboard in some older houses is a badly lit place. If the bell transformer is also located in this cupboard, it may be used to provide emergency lighting by two high-current LEDs. These diodes are powered via a small circuit that switches over to four NiCd batteries when the mains fails. The output voltage of the bell transformer is rectified by bridge B1 and buffered by capacitor C1. The batteries are charged continuously with a current of about 7.5 mA via diode D1 and resistor R2. The base of transistor T1 is high via R3, so that the transistor is cut off. When the mains voltage fails, C1 is discharged via R1; when the potential across it has dropped to a given value, the battery voltage switches on T1 via R3 and R1, provided switch S1 is closed. When T1 is on, a current of some 20 mA flows through diodes D4 and D5. The light from these LEDs is sufficient to enable the defect fuse or the tripped circuit breaker to be located.

Circuit diagram:

LED Lighting For Consumer Unit Cupboard Circuit Diagram
Author: H. Bonekamp
Copyright: Elektor Electronics

Battery-Charging Indicator For Mains Adaptor

Although you may well be the proud owner of the very latest NiCd battery charger, you may still come across the odd 'incompatible' battery, for example, one having a rare voltage or requiring a much higher charging current than can be supplied by your off-the-shelf charger. In these cases, many of you will resort to an adjustable mains adaptor (say, a 500-mA type) because that is probably the cheapest way of providing the direct voltage required to charge the battery. Not fast and not very efficient, this 'rustic' charging system works, although subject to the following restrictions:

Circuit diagram:

Battery-Charging Indicator Circuit Diagram
  1. You should have some idea of the charging current. In case you use an adaptor which is adjustable but of the unregulated, low output current type, you can adjust the current by adjusting the output voltage.
  2. You have to know if the current actually flows through the battery. A current-detecting indicator is therefore much to be preferred over a voltage indicator.
  3. To prevent you from forgetting all about the charging cycle, the indicator should be visible from wherever you pass by frequently. Using the circuit shown here, the LED lights when the baseemitter potential of the transistor exceeds about 0.2 V. Using a resistor of 1 ? as suggested this happens at a current of about 200 mA, or about 40 mA if R1 is changed to 4.7?. The voltage drop caused by this indicator can never exceed the base-emitter voltage (UBE) of the transistor, or about 0.7V. Even if the current through R1 continues to increase beyond the level at which UBE = 0.7 V, the base of the transistor will 'absorb' the excess current. The TO-220 style BU406 transistor suggested here is capable of accepting base currents up to 4A. Using this charging indicator you have overcome the restrictions 2 and 3 mentioned above.

Studio Series Stereo Headphone Amplifier

A top-class unit for the audio enthusiast!

Here's a top-class headphone amplifier that can drive high or low impedance 'phones to full power levels, with very low noise and distortion. For best performance, it can be teamed with the Stereo Preamplifier described last month. Alternatively, it can be used as a standalone unit, requiring only a power supply and a volume control pot for use with any line-level signal source (CD/MP3 player etc). It even includes dual outputs, so you can listen with a friend!
Picture of the circuit:


Many of our high-power audio amplifier designs already provide an output for headphones. The additional circuitry required for headphone support is simple; just two resistors in series with the loudspeaker outputs to limit the drive current and protect the ’phones in the case of amplifier failure.

Considering its simplicity, this resistive limiting scheme works well, although it will cause distortion if the load is non-linear – a likely prospect with most headphones. Apart from eliminating this potential source of distortion, there are a number of other reasons why you might consider building a separate headphone amplifier.

For a start, not everyone owns a pair of top-rated headphones or even a high-performance power amplifier. After all, an amplifier that equals or betters the performance of this new headphone amplifier will set you back more than a few shekels!

Parts layout:


Another reason might be for use with the latest "high-tech" audio electronics gear. The headphone outputs in much of this gear cannot drive low-impedance ’phones – or at least not to decent listening levels. In addition, available output power in portable devices is deliberately limited to conserve battery energy. This means that lots of distortion might be present at higher listening levels, even with sensitive headphones.

One way around this is to feed the line-level outputs of this gear into your power amplifier and then plug your low-impedance headphones into that. That works but then you’re tethered to an immovable object. Besides, the power required to drive headphones is around 1/1000th of that required to drive loudspeakers, so a large power amplifier could be considered a tad oversized for the job!

Circuit diagram:


Features & Performance
Main Features:
  • High performance – very low noise & distortion
  • Drives high and low-impedance headphones
  • High output power (up to 200mW; into 8? and 32?)
  • Dual headphone sockets – can drive two pairs!
  • Works with a preamp or any line-level audio source
Measured Performance:

Frequency response.......................... flat from 10Hz to 20kHz (see graphs)
Rated output power........................... 200mW into 8? and 32?, 85mW into 600?
Max. output power (current or voltage limited)...............575mW into 8?, 700mW into 32?, 130mW into 600?
Harmonic distortion........................ typically .0005% (600? load),.001% (32? load) and .005% (8? load)
Signal-to-noise ratio (A-weighted)......................... -130dB (600?), -120dB (32?) and -111dB (8?) with respect to 100mW output power.
Channel crosstalk.................. better than -68dB from 20Hz-20kHz at 100m? output power (see graphs)
Input impedance.................................... ~47k? || 47pF
Output impedance..................... ~5?

Note:

All tests were performed with the amplifier driven from low source impedance. For crosstalk measurements, the non-driven input was back-terminated into 600?.

CAUTION!

Continual exposure to very high noise levels (including loud music) will cause hearing loss and can cause tinnitus. Hearing loss is cumulative, gradual and almost symptomless! 

Laptop Protector

Protect your valuable laptop against theft using this miniature alarm generator. Fixed in-side the laptop case, it will sound a loud alarm when someone tries to take the laptop. This highly sensitive circuit uses a homemade tilt switch to activate the alarm through tilting of the laptop case. The circuit uses readily available components and can be assembled on a small piece of Vero board or a general-purpose PCB.

It is powered by a 12V miniature battery used in remote control devices. IC TLO71 (IC1) is used as a voltage comparator with a potential divider comprising R2 and R3 providing half supply voltage at the non-inverting input (pin 3) of IC1. The inverting input receives a higher voltage through a water-activated tilt switch only when the probes in the tilt switch make contact with water.

When the tilt switch is kept in the horizontal position, the inverting input of IC1 gets a higher voltage than its non-inverting input and the output remains low. IC CD4538 (IC2) is used as a monostable with timing elements R5 and C1. With the shown values, the output of IC2 remains low for a period of three minutes. CD4538 is a precision monostable multivibrator free from false triggering and is more reliable than the popular timer IC 555.

Circuit diagram:

Its output becomes high when power is switched on and it becomes low when the trigger input (pin 5) gets a low-to-high transition pulse. The unit is fixed inside the laptop case in horizontal position. In this position, water inside the tilt switch effectively shorts the contacts, so the output of IC1 remains low. The alarm generator remains silent in the standby mode as trigger pin 5 of IC2 is low.

When someone tries to take the laptop case, the unit takes the vertical position and the tilt switch breaks the electrical contact between the probes Immediately the output of IC1 becomes high and monostable IC2 is triggered. The low output from IC2 triggers the pnp transistor (T1) and the buzzer starts beeping. Assemble the circuit as compactly as possible so as to make the unit matchbox size.

Make the tilt switch using a small (2.5cm long and 1cm wide) plastic bottle with two stainless pins as contacts. Fill two-third of the bottle with water such that the contacts never make electrical path when the tilt switch is in vertical position. Make the bottle leak-proof with adhesive or wax. Fix the tilt switch inside the enclosure of the circuit in horizontal position.

Fit the unit inside the laptop case in horizontal position using adhesive. Use a miniature buzzer and a micro switch (S1) to make the gadget compact. Keep the laptop case in horizontal position and switch on the unit. Your laptop is now protected.
Source: EFY Mag

12V Speed Controller/Dimmer

This handy circuit can be used as a speed controller for a 12V motor rated up to 5A (continuous) or as a dimmer for a 12V halogen or standard incandescent lamp rated up to 50W. It varies the power to the load (motor or lamp) using pulse width modulation (PWM) at a pulse frequency of around 220Hz.

SILICON CHIP has produced a number of DC speed controllers over the years, the most recent being our high-power 24V 40A design featured in the March & April 2008 issues. Another very popular design is our 12V/24V 20A design featured in the June 1997 issue and we have also featured a number of reversible 12V designs.

Circuit looks like:


For many applications though, most of these designs are over-kill and a much simpler circuit will suffice. Which is why we are presenting this basic design which uses a 7555 timer IC, a Mosfet and not much else. Being a simple design, it does not monitor motor back-EMF to provide improved speed regulation and nor does it have any fancy overload protection apart from a fuse. However, it is a very efficient circuit and the kit cost is quite low.

Parts layout:
Connection diagram:

There are many applications for this circuit which will all be based on 12V motors, fans or lamps. You can use it in cars, boats, and recreational vehicles, in model boats and model railways and so on. Want to control a 12V fan in a car, caravan or computer? This circuit will do it for you.

Circuit diagram:

The circuit uses a 7555 timer (IC1) to generate variable width pulses at about 210Hz. This drives Mosfet Q3 (via transistors Q1 & Q2) to control the speed of a motor or to dim an incandescent lamp.

Halogen lamps:

While the circuit can dim 12V halogen lamps, we should point out that dimming halogen lamps is very wasteful. In situations where you need dimmable 12V lamps, you will be much better off substituting 12V LED lamps which are now readily available in standard bayonet, miniature Edison screw (MES) and MR16 halogen bases. Not only are these LED replacement lamps much more efficient than halogen lamps, they do not get anywhere near as hot and will also last a great deal longer.
Source: Silicon Chip 15 November 2008

Invisible Broken Wire Detector

Portable loads such as video cameras, halogen flood lights, electrical irons, hand drillers, grinders, and cutters are powered by connecting long 2- or 3-core cables to the mains plug. Due to prolonged usage, the power cord wires are subjected to mechanical strain and stress, which can lead to internal snapping of wires at any point. In such a case most people go for replacing the co e/cable, as finding the exact loca Portable loads such as video cameras, halogen flood lights, electrical irons, hand drillers, grinders, and cutters are powered by connecting long 2- or 3-core cables to the mains plug. Due to prolonged usage, the power cord wires are subjected to mechanical strain and stress, which can lead to internal snapping of wires at any point. In such a case most people go for replacing the core/cable, as finding the exact location of a broken wire is difficult. In 3-core cables, it appears almost impossible to detect a broken wire and the point of break without physically disturbing all the three wires that are concealed in a PVC jacket.  The circuit presented here can easily and quickly detect a broken/faulty wire and its breakage point in 1-core, 2-core, and 3-core cables without physically disturbing wires.  It is built using hex inverter CMOS CD4069. Gates N3 and N4 are used as a pulse generator that oscillates at around 1000 Hz in audio range.

The frequency is determined by timing components comprising resistors R3 and R4, and capacitor C1. Gates N1 and N2 are used to sense the presence of 230V AC field around the live wire and buffer weak AC voltage picked from the test probe. The voltage at output pin 10 of gate N2 can enable or inhibit the oscillator circuit. When the test probe is away from any high-voltage AC field, output pin 10 of gate N2 remains low. As a result, diode D3 conducts and inhibits the oscillator circuit from oscillating. Simultaneously, the output of gate N3 at pin 6 goes ‘low’ to cut off transistor T1. As a result, LED1 goes off. When the test probe is moved closer to 230V AC, 50Hz mains live wire, during every positive halfcycle, output pin 10 of gate N2 goes high. Thus during every positive half-cycle of the mains frequency, the oscillator circuit is allowed to oscillate at around 1 kHz, making red LED (LED1) to blink. (Due to the persistence of vision, the LED appears to be glowing continuously.) This type of blinking reduces consumption of the current from button cells used for power supply.  A 3V DC supply is sufficient for powering the whole circuit. AG13 or LR44 type button cells, which are also used inside laser pointers or in LED-based continuity testers, can be used for the circuit.

Circuit diagram :

 Invisible Broken Wire Detector Circuit Diagram

Invisible Broken Wire Detector Circuit Diagram

The circuit consumes 3 mA during the sensing of AC mains voltage. For audio-visual indication, one may use a small buzzer (usually built inside quartz alarm time pieces) in parallel with one small (3mm) LCD in place of LED1 and resistor R5. In such a case, the current consumption of the circuit will be around 7 mA. Alternatively, one may use two 1.5V R6- or AA-type batteries. Using this gadget, one can also quickly detect fused small filament bulbs in serial loops powered by 230V AC mains.  The whole circuit can be accommodated in a small PVC pipe and used as a handy broken-wire detector. Before detecting broken faulty wires, take out any connected load and find out the faulty wire first by continuity method using any multimeter or continuity tester. Then connect 230V AC mains live wire at one end of the faulty wire, leaving the other end free. Connect neutral terminal of the mains AC to the remaining wires at one end. However, if any of the remaining wires is also found to be faulty, then both ends of these wires are connected to neutral.

For single-wire testing, connecting neutral only to the live wire at one end is sufficient to detect the breakage point.  In this circuit, a 5cm (2-inch) long, thick, single-strand wire is used as the test probe. To detect the breakage point, turn on switch S1 and slowly move the test probe closer to the faulty wire, beginning with the input point of the live wire and proceeding towards its other end.LED1 starts glowing during the presence of AC voltage in faulty wire. When the breakage point is reached, LED1 immediately extinguishes due to the non-availability of mains AC voltage. The point where LED1 is turned off is the exact broken-wire point.  While testing a broken 3-core rounded cable wire, bend the probe’s edge in the form of ‘J’ to increase its sensitivity and move the bent edge of the test probe closer over the cable. During testing avoid any strong electric field close to the circuit to avoid false detection.

Author :  K. Udhaya Kumaran Vu3gth - Copyright : EFY

Water Level Controller

In most houses, water is first stored in an underground tank (UGT) and from there it is pumped up to the overhead tank (OHT) located on the roof. People generally switch on the pump when their taps go dry and switch off the pump when the overhead tank starts overflowing. This results in the unnecessary wastage and sometimes non-availability of water in the case of emergency.  The simple circuit presented here makes this system automatic, i.e. it switches on the pump when the water level in the overhead tank goes low and switches it off as soon as the water level reaches a pre-determined level. It also prevents ‘dry run’ of the pump in case the level in the underground tank goes below the suction level.

  Water Level Contoroller Circuit diagram

In the figure, the common probes connecting the underground tank and the overhead tank to +9V supply are marked ‘C’. The other probe in underground tank, which is slightly above the ‘dry run’ level, is marked ‘S’. The low-level and high-level probes in the overhead tank are marked ‘L’ and ‘H’, respectively.  When there is enough water in the underground tank, probes C and S are connected through water.As a result,transistor T1 gets forward biased and starts conducting. This, in turn, switches transistor T2 on. Initially, when the overhead tank is empty, transistors T3 and T5 are in cut-off state and hence pnp transistors T4 and T6 get forward biased via resistors R5 and R6, respectively.  As all series-connected transistors T2, T4, and T6 are forward biased, they conduct to energise relay RL1 (which is also connected in series with transistors T2, T4, and T6). Thus the supply to the pump motor gets completed via the lower set of relay contacts (assuming that switch S2 is on) and the pump starts filling the overhead tank.

Water Level Contoroller Tank Circuit

Once the relay has energised, transistor T6 is bypassed via the upper set of contacts of the relay. As soon as the water level touches probe L in the overhead tank, transistor T5 gets forward biased and starts conducting. This, in turn, reverse biases transistor T6, which then cuts off. But since transistor T6 is bypassed through the relay contacts, the pump continues to run. The level of water continues to rise.  When the water level touches probe H, transistor T3 gets forward biased and starts conducting. This causes reverse biasing of transistor T4 and it gets cut off. As a result, the relay de-energises and the pump stops. Transistors T4 and T6 will be turned on again only when the water level drops below the position of L probe.

Presets VR1, VR2, and VR3 are to be adjusted in such a way that transistors T1, T3, and T5 are turned on when the water level touches probe pairs C-S, C-H, and C-L, respectively. Resistor R4 ensures that transistor T2 is ‘off’ in the absence of any base voltage. Similarly, resistors R5 and R6 ensure that transistors T4 and T6 are ‘on’ in the absence of any base voltage. Switches S1 and S2 can be used to switch on and switch off, respectively, the pump manually.  You can make and install probes on your own as per the requirement and facilities available. However, we are describing here how the probes were made for this prototype.

The author used a piece of non-metallic conduit pipe (generally used for domestic wiring) slightly longer than the depth of the overhead tank. The common wire C goes up to the end of the pipe through the conduit. The wire for probes L and H goes along with the conduit from the outside and enters the conduit through two small holes bored into it as shown in Fig. 2. Care has to be taken to ensure that probes H and L do not touch wire C directly. Insulation of wires is to be removed from the points shown. The same arrangement can be followed for the underground tank also. To avoid any false triggering due to interference, a shielded wire may be used.

Author : JoyDeep  Kumar Chakraborty  - Copyright : Electronics For You August 2001

Power Supply for Walkie Talkies

Here is a simple power supply circuit that can be used for citizenband and VHF walkie-talkies of power rating up to 10 watts. The circuit uses a step-down transformer, followed by bridge rectifier, filter, regulator, and current booster stages. A pnp power transistor is added to the circuit to increase its current sourcing capabilities. Regulator 7812 can support around 100 mA current. When the current flowing through R1 nears 100mA value, the voltage (>0.65V) across the emitter-base junction makes transistor T1 to conduct and provide a path for additional current.

Circuit diagram :

Power-Supply-for-Walkie-Talkies-Circuit-Diagram

Power Supply for Walkie Talkies Circuit Diagram

The circuit can source around one ampere of current at 12+1.4 volts=13.4 volts. Both the regulator IC and the power transistor must be mounted on heat sinks.

Author :Pradeep G. - Copyright : Electronics For You November 2001

High Power Car Battary Eliminator

To operate car audio (or video) system from household 230V AC mains supply, you need a DC adaptor. DC adaptors available in the market are generally costly and supply an unregulated DC. To overcome these problems, an economical and reliable circuit of a high-power, regulated DC adaptor using reasonably low number of components is presented here.  Transformer X1 steps down 230V AC mains supply to around 30V AC, which is then rectified by a bridge rectifier comprising 5406 rectifier diodes D1 through D4. The rectified pulsating DC is smoothed by two 4700μF filter capacitors C1 and C2. The next part of the circuit is a seriestransistor regulator circuit realised using high-power transistor 2N3773 (T1).

High Power Car Battary Eliminator Circuit Daigram 

Fixed-base reference for the transistor is taken from the output pin of 3-pin regulator IC1 (LM 7806). The normal output of IC1 is raised to about 13.8 volts by suitably biasing its common terminal by components ZD1 and LED1. This simple arrangement provides good, stable voltcuit age reference at a low cost. LED1 also works as an output indicator.Finally, a crowbar-type protection circuit is added. If the output voltage exceeds 15V due to some reason such as component failure, the SCR fires because of the breakdown of zener ZD2. Once SCR fires, it presents a short-circuit across the unregulated DC supply, resulting in the blowing of fuse F1 instantly. This offers guaranteed protection to the equipment connected and to the circuit itself.

 High Power Car Battary Eliminator

This circuit can be assembled using a small general-purpose PCB. A goodquality heat-sink is required for transistor T1. Enclose the complete circuit in a readymade big adaptor cabinet as shown in the figure.

Author : T.K. Hareendran - Copyright : Electronics for  You June 2001

Dual-Input High-Fidelity Audio Mixer

The circuit described here is based on the superior characteristics of dual-gate MOSFET (metal-oxide semiconductor field-effect transistor). It exhibits a very high input impedance that lends for good sensitivity and very less loading of the input signal source. Low cross-modulation characteristic leads to minimal distortion of the output with respect to the input signals. Also, the MOSFET offers low feedback capacitance and high transconductance. All these advantages make the MOSFET the most effective for high-quality mixer and converter applications. This dual-input audio frequency mixer circuit employs a single dual-gate MOSFET 3N200. One may, however, substitute it with any other dual-gate.  MOSFET such as 3N187 and BF966. (It is to be noted that BF966 is not gateprotected and hence calls for suitable precaution in handling it.) The audio frequency (AF) input from the first channel (CH1) is applied on gate 1 (G1) of the MOSFET through 500- kilo-ohm potentiometer VR1. The AF input from the second channel (CH2) is applied on gate 2 (G2) of the MOSFET through another 500-kilo-ohm potentiometer VR2. Potentiometers VR1 and VR2 serve as gain controls for the mixer inputs.

Circuit diagram :

Dual-Input High-Fidelity Audio Mixer-Circuit-Diagram

Dual-Input High-Fidelity Audio Mixer Circuit Diagram

Gate 1 receives the negative bias resulting from the voltage developed by the current passing through resistor R1 that is in series with the source. Gate 2 receives the positive bias produced across resistor R3 by the voltage divider formed by resistors R3 and R4. The mixed common output signal developed across drain load resistor R2 is coupled to the output through capacitor C5. This output can be, in turn, fed to any audio amplifier system for further amplification. The input impedance at each signal input is approximately 500 kilo-ohm, which is determined largely by the resistance of potentiometers VR1 and VR2. Higher input impedance may be obtained by substituting higher-resistance potentiometers, but this will lead to the pickup of stray signals.

The current drain of this circuit at 6V DC is less than 3 mA. The open-circuit voltage gain is 10 for each channel. The maximum amplitude of input signals at gates G1 and G2 is 0.1V RMS. Signals of higher amplitudes are reduced by the adjustment of potentiometers VR1 and VR2, hence evading the output signal peak-clipping. The corresponding output signal amplitude is 1V RMS. The entire circuit can be built on a general-purpose PCB or veroboard. The complete assembly is shielded using a metal container. The two input jacks should be fixed on the opposite sides of the container against the output jack.  This simple circuit can be utilised for various combinations of devices at the input end. A few examples are two microphones, two audio players, or one audio player and one microphone, etc.

Note. Adequate precautions should be taken to prevent the destruction of MOSFET due to static electricity. The use of a grounded tip for the soldering iron is recommended.

Author  : Prasad J. - Copyright : EFY

Stereo Tape Head Preamplifier For Pc Sound Card

Here is a stereo tape head preamplifier circuit for your PC sound card that can playback your favourite audio cassette through the PC. Audio signals from this circuit can be di Here is a stereo tape head preamplifier circuit for your PC sound card that can playback your favourite audio cassette through the PC. Audio signals from this circuit can be directly connected to the stereo-input (lineinput) socket of the PC sound card for further processing. The circuit is built around a popular stereo head preamp IC LA3161.

Circuit diagram:

Stereo Tape Head Preamplifier For Pc Sound Card Circuit Diagram

Stereo Tape Head Preamplifier For Pc Sound Card Circuit Diagram

Weak electrical signals from the playback heads are fed to pins 1 and 8 of IC1 via DC decoupling capacitors C1 and C6, respectively. Components between pins 2 and 3 and pins 6 and 7 provide adequate equalisation to the signals for a normal tape playback.  The amplified and equalised signals available at output pins 3 and 6 of IC1 are coupled to the inputs of line amplifier circuit built around transistors T1 (via capacitor C5, potmeter VR1, resistor R8, and capacitor C12) and T2 (via capacitor C10, potmeter VR2, resistor R19, and capacitor C16), respectively. Left and right playback levels can be adjusted by variable resistors VR1 and VR2. The audio signals are finally available at the negative ends of capacitors C13 and C17. The circuit wired around relay driver transistor T3 serves as a simple source selector. This is added deliberately to help the user share the common PC sound card line-input terminal for operating some other audio device as well.

When the preamplifier is in ‘off’ state,switching relay RL1 is off and it allows connection of external signals to the sound card. When the preamplifier is turned ‘on’,the relay is energised by transistor T3 after a short delay determined by the values of resistor R21 and capacitor C23. On energisation, the relay contacts changeover the signals to internal source,i.e. the head preamplifier. After constructing the whole circuit on a veroboard, enclose it in a mini metallic cabinet with level controls and sockets at suitable points. Use a regulated 1A, 12V DC power supply for powering the whole circuit including the tape deck mechanism. (A 1A, 18V AC secondary transformer with 4700μF, 40V electrolytic capacitor and 78M12 regulator is sufficient.) You can use any kind of tape deck mechanism with this circuit. Use of goodquality playback head and well-screened wires are recommended.

Author : T.K.Hareendran - Copyright : Electronics for You October 2001

Precision Amplifier With Digital Control

This circuit is similar to the preceding circuit of the attenuator. Gain of up to 100 can be achieved in this configuration, which is useful for signal conditioning of low output of transducers in millivolt range. The gain selection resistors R3 to R6 can be selected by the user and can be anywhere from 1 kilo-ohm to 1 meg-ohm. Trimpots can be used for obtaining any value of gain required by the user. The resistor values shown in the circuit are for decade gains suitable for an autoranging DPM. Resistor R1 and capacitor C1 reduce ripple in the input and also snub transients. Zeners Z1 and Z2 limit the input to ±4.7V, while the input current is limited by resistor R1. Capacitors C2 and C3 are the power supply decoupling capacitors.

Circuit diagram :

Precision Amplifier With Digital Control Circuit Diagram

Precision Amplifier With Digital Control Circuit Diagram

Op-amp IC1 is used to increase the input impedance so that very low inputs are not loaded on measurement. The user can terminate the inputs with resistance of his choice (such as 10 megohm or 1 meg-ohm) to avoid floating of the inputs when no measurement is being made. IC5 is used as an inverting buffer to restore polarity of the input while IC4 is used as buffer at the output of CD4052, because loading it by resistance of value less than 1 meg-ohm will cause an error. An alternative is to make R7=R8=1 meg-ohm and do away with IC4, though this may not be an ideal method.

Truth Table

Gains greater than 100 may not be practical because even at gain value of 100 itself, a 100μV offset will work out to be around 10 mV at the output (100μV x 100). This can be trimmed using the offset null option in the OP07, connecting a trimpot between pins 1 and 8, and connecting wiper to +5V supply rails.For better performance, use ICL7650 (not pin-compatible) in place of OP07 and use ±7.5V instead of ±5V supply.Eight steps for gain or attenuation can be added by using two CD4051 and pin 6 inhibit on CD4051/52. More steps can be added by cascading many CD4051, or CD4052, or CD4053 ICs, as pin 6 works like a chip select.

Some extended applications of this circuit are given below.
1. Error correction in transducer amplifiers by correcting gain.
2. Autoranging in DMM.
3. Sensor selection or input type selection in process control.
4. Digitally preset power supplies or electronic loads.
5. Programmable precision mV or mA sources.
6. PC or microcontroller or microprocessor based instruments.
7. Data loggers and scanners.

Author : Anantha Narayan - Copyright : EFY

Remote-Controlled Fan Regulator Circuit Diagram

Using this circuit, you can change the speed of the fan from your couch or bed. Infrared receiver module TSOP1738 is used to receive the infrared signal transmitted by remote control. The circuit is powered by regulated 9V. The AC mains is stepped down by transformer X1 to deliver a secondary output of 12V-0-12V. The transformer output is rectified by full-wave rectifier comprising diodes D1 and D2, filtered by capacitor C9 and regulated by 7809 regulator to provide 9V regulated output. Any button on the remote can be used for controlling the speed of the fan. Pulses from the IR receiver module are applied as a trigger signal to timer NE555 (IC1) via LED1 and resistor R4.

Circuit Diagram :

Remote-Controlled Fan Regulator Circuit Diagram

Remote-Controlled Fan Regulator Circuit Diagram

IC1 is wired as a monostable multivibrator to delay the clock given to decade counter-cum-driver IC CD4017 (IC2).Out of the ten outputs of decade counter IC2 (Q0 through Q9), only five (Q0 through Q4) are used to control the fan. Q5 output is not used, while Q6 output is used to reset the counter. Another NE555 timer (IC3) is also wired as a monostable multivibrator. Combination of one of the resistors R5 through R9 and capacitor C5 controls the pulse width.  The output from IC CD4017 (IC2) is applied to resistors R5 through R9. If Q0 is high capacitor C5 is charged through resistor R5, if Q1 is high capacitor C5 is charged through resistor R6, and so on.

Optocoupler MCT2E (IC5) is wired as a zero-crossing detector that supplies trigger pulses to monostable multivibrator IC3 during zero crossing. Opto-isolator MOC3021 (IC4) drives triac BT136. Resistor R13 (47-ohm) and capacitor C7 (0.01µF) combination is used as snubber network for triac1 (BT136). As the width of the pulse decreases, firing angle of the triac increases and speed of the fan also increases. Thus the speed of the fan increases when we press any button on the remote control. Assemble the circuit on a general-purpose PCB and house it in a small case such that the infrared sensor can easily receive the signal from the remote transmitter.

Author :Dr C.H. Vithalani  Copyright : www. efymag .com

Simple Electronic Lock

There are six (or more) push switches. To 'unlock' you must press all the correct ones at the same time, but not press any of the cancel switches. Pressing just one cancel switch will prevent the circuit unlocking. When the circuit unlocks it actually just turns on an LED for about one second, but it is intended to be adapted to turn on a relay which could be used to switch on another circuit. Please Note: This circuit just turns on an LED for about one second when the correct switches are pressed. It does not actually lock or unlock anything!

Circuit diagram :

 Simple Electronic Lock Circuit Diagram

Simple Electronic Lock Circuit Diagram

Stripboard Layout :


Stripboard Layout

Parts :

  • resistors: 470, 100k ×2, 1M
  • capacitors: 0.1μF, 1μF 16V radial
  • on/off switch
  • push-switch ×6 (or more)
  • stripboard 12 rows × 25 holes
  • red LED
  • 555 timer IC
  • 8-pin DIL socket for IC
  • battery clip for 9V PP3

A kit for this project is available from RSH Electronics: www.kpsec.freeuk.com

Copyright :John Hewes 2006,  The Electronics Club

Solar Cell Phone Charger Circuit

 Solar Cell Phone Charger

This little gadget uses a small 3 volt solar cell to charge a 6 volt NiCad battery pack which, in turn, may be used to charge many models of cell phones and other portable devices. The circuit "scavenges" energy from the solar cell by keeping it loaded near 1.5 volts (maximum energy transfer value) and trickle charges the internal battery pack with current pulses. The simple circuit isn't the most efficient possible but it manages a respectable 70% at 100 mA from the cell and 30% when the cell is providing only 25 mA which is actually pretty good without going to a lot more trouble or using more exotic components.

Solar Cell Phone Charger Circuit Diagram

Note:

This circuit is intended for using a low voltage cell to charge a higher voltage battery. Don't use it to charge a battery at the same or lower voltage than the cells generate. The circuit needs a battery load to work properly. Different models of phones have different charging requirements and this charger may not work with all models.

Ref.     Description

PC1     3 volt solar cell from a sidewalk solar light
C1     22 uF, 10 volt (values not critical)
C2     100 pF, any voltage or type, typically ceramic
C3     10 uF, 16 volt or more for higher voltage battery
R1     1.5 k, any type
R2     3.9k, any type
R3     10k, any type
R4     180 ohm, any type
R5     4.7k, any type
R6     10 ohm PTC (see text).
L1     50 to 300 uH (see text)
D1     1N5818 schottky rectifier, just about any will do.
Q1     2N4403, or similar
Q2     2N4401, or similar
J1     output jack
B1     6 volt NiCad battery w/fuse


Here is how it works:

When the voltage on the emitter of Q1 rises a little over 1.5 volts, both transistors turn on quickly, snapping on due to the positive feedback through R5 and C2. The current increases in L1 through Q2 until the voltage across the cell drops somewhat below 1.5 volts. The circuit then switches off quickly and the voltage on the collector of Q2 jumps up, turning on D1, allowing the inductor current to flow into the battery. Once the inductor has discharged into the battery, the process starts over. The circuit can charge higher voltage batteries without any circuit changes since the voltage will jump up quite high on the collector when the transistors turn off. The circuit should not be operated without a battery attached. For a little more efficiency, increase R5 in proportion to the voltage increase on the battery. (For example, double R5 for charging a 12 volt battery.) A NiCad battery was chosen because they are particularly forgiving of overcharging, simply converting the excess current into heat.

Solar Cell Phone Charger 2 

The photocell was salvaged from an inexpensive solar sidewalk illuminator and it has an open-circuit voltage of about 3 volts and supplies about 100 mA in bright sunlight. The circuit can handle more current but avoid cells that supply more than 250 mA. The inductor should have a low resistance winding but a surprising number of cores will work fairly well. The core in the prototype is actually a piece of ferrite antenna rod chosen simply to fit in the extremely limited confines of the package. Another unlikely inductor that worked well was 10 turns on one of those 1" long, 1/2" diameter large ferrite beads often used for power line baluns! The value of inductance isn't critical, perhaps between 40 and 300 uH and during proper operation there will be a pulse waveform on the collector of Q2 with several 10s of microseconds period. This prototype operates at about 40 uS as shown and the inductance measures about 50 uH.

For experimenting with cores or other circuit values, replace the NiCad battery with a zener of the same voltage and replace the solar cell with a 3 volt power supply with a series resistor, about 22 ohms to simulate moderate sun. Measure the current in the zener and compare that power (zener current times zener voltage) to the power coming from the power supply (3 volts times power supply current) to see how the circuit is doing. When the power in the zener is over half the power from the supply, the inductor is good enough.

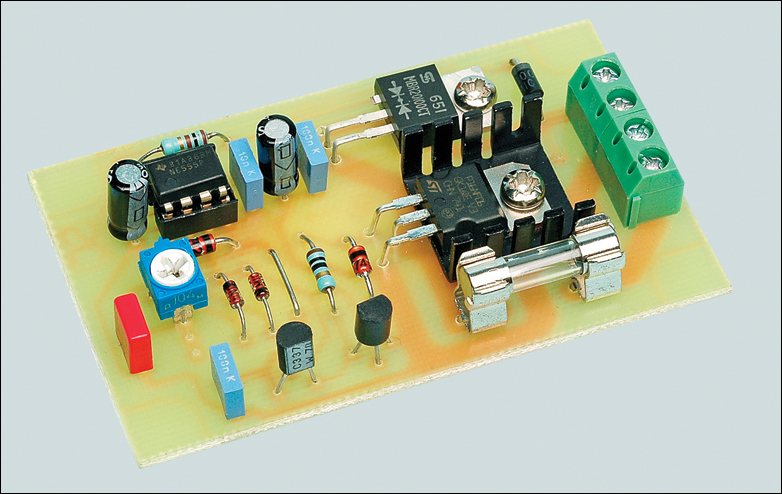
It is mandatory that a fuse be added near one of the terminals of the battery! (See the little green 2 amp fuse along the bottom edge of the battery.) Battery packs can supply dangerous current levels! Keep the lead from the fuse to the battery terminal as short as practical. I had to change this fuse; I'm glad it was there!

In addition to the fuse a 10 ohm PTC was added in series with the output to limit the available power but also to allow the unit to charge my Nokia phone which doesn't like a very low impedance battery as a charging source. (The phone simply displays "battery not charging".) I have a few thousand of those, if you need a couple (charles@wenzel.com). The PTC is actually soldered directly to the copper board and one end of the fuse connects directly to the top side.

Don't copy my assembly technique! First of all, I had to cut all the mounting posts out of the case to get the battery to fit and it is held in by glue. Notice the silver nuts soldered onto the PCB for securing the cover! Secondly, there is very little height for the circuitry so everything is pressed down flat against a piece of copper clad board using little bits of board for the connections. That's a fine technique but this prototype was just too tight for comfort. Third, I had to search a while to find an inductor that would fit! All the room was used up before I got to one of the larger parts! Having said all this, the final unit is very compact and solid but there was too much luck involved!

It works great! I simply leave it on my dash until I need it. I've charged several Nokia phones without a problem. It is actually more convenient than a cigarette lighter adapter because it can travel with the phone and it doesn't need sunlight to charge the phone. I will say that the thing charges my phone suspiciously fast and I wonder if I should increase the output resistance. Fast charging cell phone batteries shortens their life, if I understand correctly. Most phones have sophisticated internal charging circuits but I suspect the manufacturers sacrifice battery life for fast charging. It might simply be that my phone hasn't been significantly discharged since I built the charger.

Author : Charles Wenzel -Source: techlib.com

Digital Step-Km Counter

This circuit measures the distance covered during a walk. Hardware is located in a small box slipped in pants' pocket and the display is conceived in the following manner: the leftmost display D2 (the most significant digit) shows 0 to 9 Km. and its dot is always on to separate Km. from hm. The rightmost display D1 (the least significant digit) shows hundreds meters and its dot illuminates after every 50 meters of walking. A beeper (excludable), signals each count unit, occurring every two steps. A normal step was calculated to span around 78 centimeters, thus the LED signaling 50 meters illuminates after 64 steps (or 32 operations of the mercury switch), the display indicates 100 meters after 128 steps and so on.

For low battery consumption the display illuminates only on request, pushing on P2. Accidental reset of the counters is avoided because to reset the circuit both pushbuttons must be operated together. Obviously, this is not a precision meter, but its approximation degree was found good for this kind of device. In any case, the most critical thing to do is the correct placement of the mercury switch inside of the box and the setting of its sloping degree.

Circuit diagram:

digital_step_km_counter_circuit_diagram

Digital Step-Km Counter Circuit Diagram

Parts:

R1 = 22K 1/4W Resistor
R2 = 2.2M 1/4W Resistor
R3 = 22K 1/4W Resistor
R4 = 1M 1/4W Resistor
R5 = 4.7K 1/4W Resistor
R6 = 47R 1/4W Resistor
R7 = 4.7K 1/4W Resistor
R8 = 4.7K 1/4W Resistor
R9 = 1K 1/4W Resistor

C1 = 47nF 63V Polyester Capacitor
C2 = 100nF 63V Polyester Capacitor
C3 = 10nF 63V Polyester Capacitor
C4 = 10µF 25V Electrolytic Capacitor

D1 = Common-cathode 7-segment LED mini-display (Hundreds meters)
D2 = Common-cathode 7-segment LED mini-display (Kilometers)

Q1 = BC327 45V 800mA PNP Transistors
Q2 = BC327 45V 800mA PNP Transistors

P1 = SPST Pushbutton (Reset)
P2 = SPST Pushbutton (Display)

IC1 = 4093 Quad 2 input Schmitt NAND Gate IC
IC2 = 4024 7 stage ripple counter IC
IC3 = 4026 Decade counter with decoded 7-segment display outputs IC
IC4 = 4026 Decade counter with decoded 7-segment display outputs IC

SW1 = SPST Mercury Switch, called also Tilt Switch
SW2 = SPST Slider Switch (Sound on-off)
SW3 = SPST Slider Switch (Power on-off)

BZ = Piezo sounder
B1 = 3V Battery (2 AA 1.5V Cells in series)

Circuit operation:

IC 1A & IC 1B form a monostable multi vibrator providing some degree of freedom from excessive bouncing of the mercury switch. Therefore a clean square pulse enters IC2 that divides by 64. Q2 drives the LED dot-segment of D1 every 32 pulses counted by IC2. Either IC3 & IC4 divide by 10 and drive the displays. P1 resets the counters and P2 enables the displays. IC1C generates an audio frequency square wave that is enabled for a short time at each monostable count. Q1 drives the piezo sounder and SW2 allows disabling the beep.

Notes:

  • Experiment with placement and sloping degree of mercury switch inside the box: this is very critical.
  • Try to obtain a pulse every two walking steps. Listening to the beeper is extremely useful during setup.
  • Trim R6 value to change beeper sound power.
  • Push P1 and P2 to reset.
  • This circuit is primarily intended for walking purposes. For jogging, further great care must be used with mercury switch placement to avoid undesired counts.
  • When the display is disabled current consumption is negligible, therefore SW3 can be omitted.

Source : www.extremecircuits.net

Electronic Motor Starter

This motor starter protects single-phase motors against voltage fluctuations and overloading. Its salient feature is a soft on/off electronic switch for easy operation. The transformer steps down the AC voltage from 230V to 15V. Diodes D1 and D2 rectify the AC voltage to DC. The unregulated power supply is given to the protection circuit. In the protection circuit, transistor T1 is used to protect the motor from over-voltage. The over-voltage setting is done using preset VR1 such that T1 conducts when voltages goes beyond upper limit (say, 260V).

When T1 conducts, it switches off T2. Transistor T2 works as the under-voltage protector. The under-voltage setting is done with the help of preset VR2 such that T2 stops conducting when voltage is below lower limit (say, 180V). Zener diodes ZD1 and ZD2 provide base bias to transistors T1 and T2, respectively. Transistors T3 and T4 are connected back to back to form an SCR configuration, which behaves as an ‘on’/‘off’ control.Switch S1 is used to turn on the pump, while switch S2 is used to turn off the pump.

Circuit diagram:

Electronic Motor Starter Cicuit Diagram

Electronic Motor Starter Circuit Diagram

While making over-/under-voltage setting, disconnect C2 temporarily. Capacitor C2 prevents relay chattering due to rapid voltage fluctuations. Regulator IC 7809 gives the 9V regulated supply to soft switch as well as the relay after filtering by capacitor C4. A suitable miniature circuit breaker is used for automatic over-current protection. Green LED (LED1) indicates that the motor is ‘on’ and red LED (LED2) indicates that the power is ‘on’. The motor is connected to the normally-open contact of the relay. When the relay energizes, the motor turns on.

Author : T.B. Babu Copyright : Electronics For You October 2003

Audio Clipping Indicator

Detects clipping in preamp stages, mixers, amplifiers etc., Single LED display - 9V Battery supply unit

This circuit was intended to be used as a separate, portable unit, to signal by means of a LED when the output wave form of a particular audio stage is "clipping" i.e. is reaching the onset of its maximum permitted peak-to-peak voltage value before an overload is occurring. This will help the operator in preventing severe, audible distortion to be generated through the audio equipment chain.

This unit is particularly useful in signaling overload of the input stages in mixers, PA or musical instruments amplification chains, but is also suited to power amplifiers. A careful setting of Trimmer R5 will allow triggering of the LED with a wide range of peak-to-peak input voltages, in order to suit different requirements. Unfortunately, an oscilloscope and a sine wave frequency generator are required to accurately setup this circuit. Obviously, the unit can be embedded into an existing mixer, preamp or power amplifier, and powered by the internal supply rails in the 9 - 30V range. The power supply can also be obtained from higher voltage rails provided suitable R/C cells are inserted. SW1 and B1 must obviously be omitted.

Circuit diagram:

Audio_Clipping_Indicator_Circuit DIagram

Audio Clipping Indicator Circuit Diagram

Parts:
R1___________1M 1/4W Resistor (See Notes)
R2,R3,R8_____100K 1/4W Resistors
R4,R6________10K 1/4W Resistors
R5___________5K 1/2W Trimmer Cermet or Carbon
R7___________2K2 1/4W Resistor
R9___________22K 1/4W Resistor
R10__________1K 1/4W Resistor (See Notes)
C1,C4________220nF 63V Polyester Capacitors
C2___________4p7 63V Ceramic Capacitor (See Notes)
C3___________220µF 25V Electrolytic Capacitor
C5___________10µF 25V Electrolytic Capacitor (See Notes)
D1,D2________1N4148 75V 150mA Diodes
D3___________LED (Any dimension, shape and color)
Q1___________BC547 45V 100mA NPN Transistor
IC1___________TL062 Dual Low current BIFET Op-Amp (or TL072, TL082)
SW1__________SPST Toggle or Slide Switch (See Text)
B1____________9V PP3 Battery (See Text)

Circuit operation:

The heart of the circuit is a window comparator formed by two op-amps packaged into IC1. This technique allows to detect precisely and symmetrically either the positive or negative peak value reached by the monitored signal. The op-amps outputs are mixed by D1 and D2, smoothed by C4, R7 and R8, and feed the LED driver Q1 with a positive pulse. C5 adds a small output delay in order to allow detection of very short peaks.

Notes:

  • With the values shown, the circuit can be easily set up to detect sine wave clipping from less than 1V to 30V peak-to-peak (i.e. 15W into 8 Ohms). If you need to detect higher output peak-to-peak voltages, R1 value must be raised. On the contrary, if the circuit will be used to detect only very low peak-to-peak voltages, it is convenient to lower R1 value to, say, 220K omitting C2. In this way, the adjustment of R5 will be made easier.
  • Using a TL062 chip at 9V supply, stand-by current drawing is about 1.5mA and less than 10mA when the LED illuminates. With TL072 or TL082 chips, current drawing is about 4.5mA and 13mA respectively.
  • When using power supplies higher than 12V, the value of R10 must be raised accordingly.
  • When using power supplies higher than 25V, the working voltage value of C5 must be raised to 35 or 50V.

Source :  www.redcircuits.com